SQLITE NOT INSTALLED
Building a house or any structure is like telling a long story: it has a beginning, a middle, and a satisfying top. In German building terms, that beginning is the Gründung (the foundation) and the top is the Dachstuhl (the roof truss). Between them sits a complex sequence of decisions, inspections, deliveries and hands-on work that together form the Bauablauf — the construction sequence. If you are an owner, a budding project manager, or simply a curious reader, this article walks you through the full arc from site preparation to the finished roof, with practical tips, common pitfalls, and clear checklists you can use on any project. Think of it as a conversational tour of a construction site, where we’ll stop at each key stage and explain what happens, why it matters, who’s responsible, and how to keep things running smoothly.
Why the sequence matters: the logic behind the Bauablauf
Construction is a choreography of trades, materials, permits and weather. If one step is rushed or skipped, the dominoes can fall: poor foundations lead to structural problems, uncoordinated services force costly rework, and delays in the roof phase expose the building to weather. That’s why the Bauablauf is planned with care. The idea is simple — start with the ground and move upward, layering disciplines so each becomes the base for the next. But the reality is human and logistical: deliveries must be timed, inspections scheduled, and emerging problems resolved on the fly. In the best projects, communication is constant, and each trade knows exactly when to arrive and what to expect. In the worst, assumptions create chaos. We’ll unpack each phase so you can see the rationale and anticipate where things commonly go wrong.
Overview of the main phases
Construction can be split into broad stages that make planning more manageable. These stages are not rigid; projects overlap and some tasks run in parallel, but the sequence is consistent:
- Pre-construction: planning, design, permits, financing
- Site preparation and earthworks
- Gründung (foundation) — strip, slab, raft or piles
- Basement and ground-floor walls
- Structural shell: walls, columns, beams, and floors (Decken)
- Rough installations: electrical, plumbing, HVAC
- Roof construction: Dachstuhl and covering
- Finishes, external works and handover
Below we’ll explore each phase in depth, including the decisions you’ll face, the inspections that matter, and practical tips to avoid delays and cost overruns.
Pre-construction: planning, permits and ground investigation
Before a shovel touches the ground, much of the project’s fate is sealed. The planning stage includes architectural design, structural engineering, cost estimating, scheduling, and the all-important permitting process. A key early step is a geotechnical ground investigation. Soil type, groundwater level, and load-bearing capacity determine the appropriate Gründung. A sandy, well-draining site might accept a shallow strip foundation, while clay or areas with a high water table may require a raft foundation or piles. Skipping or skimping on a geotechnical report is a false economy — unexpected soil behavior is one of the most common causes of later structural problems.
Permits and approvals can take weeks to months depending on local rules. Engage early with local building authorities and ensure all drawings and calculations meet regulations. Your contractor and architect should handle much of this, but as the project owner you should track timelines and contingency options. Financing should be aligned with the building schedule, as many lenders release funds in pre-defined tranches tied to construction milestones.
Essential tasks in pre-construction
- Hire architect and structural engineer
- Order soil/geotechnical report
- Prepare and submit planning applications
- Develop a project schedule and budget
- Coordinate utilities and site access
Site preparation and earthworks
The site is readied once permits are in place. This stage includes clearing vegetation, setting up site fencing, temporary access roads, and installing utilities to the point of connection. Earthworks involve excavation to the required depths for foundations, basements, or drainage swales. Proper site set-out — planting pins, reference lines and levels — ensures the building sits correctly in the landscape.
During excavation you will often uncover surprises: unexpected rock, contaminated soils, or archaeological finds. Prepare for change orders. Keep health and safety in mind; trenches demand shoring or sloped sides to prevent collapse, and heavy machinery requires trained operators and clear communication to keep workers and the public safe.
Key checks during earthworks
- Verify set-out against architectural drawings
- Check excavation depths with the engineer
- Monitor groundwater and dewatering needs
- Document any unexpected discoveries
Foundations and Gründung: where it all begins

Foundations transfer loads from the structure into the ground. This stage is often called the Gründung in German and is foundational — literally and figuratively — to a successful build. The chosen foundation type depends on soil conditions, structural loads, and budget.
Common foundation types:
| Foundation type | Typical use | Advantages | Considerations |
|---|---|---|---|
| Strip foundation | Load-bearing walls on good soils | Simple and economical | Requires stable soil; not for heavy point loads |
| Slab-on-grade | Ground floors in mild climates | Fast, inexpensive, integrates floor heating | Must manage insulation and moisture barriers |
| Raft foundation | Weak soils, spreads loads over a large area | Reduces differential settlement | More concrete, higher cost |
| Pile foundation | Deep weak soils where shallow spread won’t work | Transfers load to deeper competent strata | Requires specialist equipment and design |
Concrete quality, steel reinforcement placement, and correct formwork are crucial. Ensure reinforcement is installed as per the structural engineer’s drawings and that concrete is poured in suitable weather conditions. Cold or hot weather concreting requires special handling and curing.
Waterproofing and drainage
Especially when dealing with basements or high groundwater, waterproofing is a major consideration. The sequence here matters: drainage (e.g., perimeter drains), membranes, and protective boards must be installed in the correct order so that water is directed away from the structure. Many problems arise later because the drainage wasn’t tied into the site’s broader stormwater plan.
Basement walls and ground floor structure
Once the foundation is cured, the next step is to put up the basement walls or ground-floor masonry. This might be blockwork, poured concrete, or prefabricated insulated panels. At this stage, checks for verticality, water-tightness and insulation continuity are important.
Where basements are concerned, consider ventilation and moisture control. A ventilated cavity, sump pump arrangements and domed access covers are small details that reduce long-term maintenance headaches.
Floor structures and Decken (ceilings/floors)
The ground floor slab or suspended floor (Decke) serves as the base for internal partitions, finishes, and first-floor loads. Choices include:
- Reinforced concrete slabs (monolithic or staged)
- Precast concrete elements
- Timber joist systems
- Composite systems combining concrete and steel
Each has implications for fire resistance, acoustic performance, thermal mass and installation speed. For multi-storey buildings, precast elements can accelerate the sequence because they arrive ready to install, reducing time exposed to weather.
Structural walls, columns and load-bearing elements
With the floors in place, the vertical structure — load-bearing walls, columns and beams — takes shape. Coordination with structural steel or reinforced concrete crews is vital. Steel beams are often installed quickly but require precise alignment and bolting; concrete requires formwork, reinforcement and cures. Tolerances matter: small misalignments cause headaches later when installing windows, doors and finishes.
Regular structural inspections at key milestones (reinforcement checks, formwork checks, load tests where specified) keep quality high and prevent rework.
Rough installations: electrical, plumbing and HVAC
Once the structural shell is weather-tight, mechanical, electrical, and plumbing (MEP) trades begin. This is sometimes called “back-of-house” work, but it’s where the building truly becomes habitable. The order often runs:
- Plumbing: drainage lines, soil stacks, and main cold-water supply
- HVAC: duct routes, mechanical units, and ventilation shafts
- Electrical: main service, distribution boards, and conduits
- Communications and low-voltage systems
Coordination is key. Services must be routed so they don’t clash in tight spaces between floors and within service shafts. Many projects now use coordinated 3D models (BIM) to identify clashes ahead of time, saving weeks in on-site corrections.
Inspections and testing
Rough-in inspections verify that installations meet codes before walls are closed. Pressure testing of plumbing, electrical continuity tests and fire-stopping verification are typical. Passing these inspections avoids costly re-openings.
Internal walls, partitions and insulation
With services roughed-in, internal walls and partitions can be installed and finished. This is also the time to install thermal and acoustic insulation. Insulation continuity across the building envelope — between floors, around windows and at junctions — prevents thermal bridges that can lead to condensation and heat loss.
If you’re using timber framing or light steel partitions, ensure that fire-resistance requirements are met and that sound insulation meets the standards you desire for comfort.
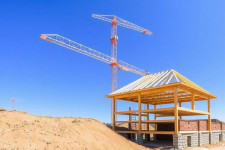
The Dachstuhl: designing and building the roof truss
Reaching the roof phase is one of the most rewarding moments on site. The Dachstuhl — commonly a timber roof truss but sometimes steel or prefabricated timber systems — defines the building’s character and protects it from weather. The sequence for the roof includes design, prefabrication (if any), lifting and fixing, insulation and covering.
Design considerations for the Dachstuhl
Roof design considers span, pitch, snow load, wind load, and the intended roof covering. Timber trusses are popular because they are economical, sustainable, and allow large open spans. Key factors:
- Span and support points: ensure load paths are continuous to foundations
- Pitch and weather: steeper pitches shed snow and water faster
- Insulation and ventilation: warm roofs vs. cold roofs vs. ventilated assemblies
- Fire performance and treatment of timber
Advanced timber truss manufacturers often deliver custom-made prefabricated trusses that speed installation and improve quality. They arrive on site ready to assemble, usually requiring a crane and a small crew to quickly fix trusses in sequence.
Putting up the Dachstuhl
The physical erection of the roof is a sequence of carefully choreographed steps: install ridge boards or purlins, lift trusses into place, temporarily brace them, fix permanent bracing, and complete the deck. Weather windows are short: once the roof deck is on and the covering installed, interior trades can continue without risking moisture damage. Timing and safety are paramount — fall protection and crane operations must be planned and supervised.
Roof coverings and weatherproofing
Roof coverings range from clay tiles and slate to metal sheets and membrane systems. The choice affects longevity, weight (important for structural design), appearance, and maintenance. Flashings, valleys, and eaves details are small elements but major sources of leaks if poorly executed. An experienced roofer will pay attention to transitions at chimneys, skylights, and ventilation penetrations.
Ventilation strategies matter: a ventilated cavity under tiles prevents condensation and helps regulate temperature. For insulated flat roofs, waterproofing membranes must be detailed and maintained meticulously.
Checklist for roof completion
- Verify truss spacing and bracing per design
- Check underlay and vapor control layers
- Confirm flashing details with installer
- Inspect all penetrations and seals
- Arrange for fall protection removal only after permanent systems are in place
Windows, doors and making the building weather-tight
After the roof is finished, installing windows and doors completes the weather-tight envelope. The sequence here impacts interior work: once fenestration is in place, you can safely proceed with painting, floor finishes and sensitive installations. Quality of installation determines energy performance and durability — poor flashing, incorrect seals or non-aligned frames lead to drafts, leaks and unhappy occupants.
External works and landscaping
Around the building, external works such as driveways, terraces, drainage swales, and landscaping should be planned in parallel with the latter stages of construction. Coordination prevents heavy machinery from damaging finished surfaces. Temporary access routes often need to be maintained until the final surfaces are laid.
Finishings: internal fit-out and quality control
Finish work turns a shell into a home or a functional building — plaster, painting, flooring, trims, kitchens, bathroom fittings and final MEP connections. By this point, the sequence needs high-quality coordination: trades must follow a logical order so one work doesn’t spoil another (e.g., painters after wet trades are complete and dust controlled). Regular snagging inspections and defect lists keep the final handover tidy.
Snagging and punch lists
A punch list captures minor defects to be fixed before final acceptance. Create the punch list in stages: initial snagging at practical completion and a final walk-through after occupancy, and ensure liabilities and rectification timelines are clearly documented.
Handover, commissioning and documentation
Handover is more than handing over keys. It is a process of commissioning building systems, verifying as-built documentation, and transferring warranties. Commissioning HVAC systems, pressure-tested plumbing, and electrical safe-operation checks ensure everything works as intended. Provide the owner with:
- As-built drawings
- Operation and maintenance manuals
- Warranty documents and contact points
- Test certificates and inspection sign-offs
Good documentation reduces disputes and makes future maintenance straightforward.
Project schedule example: a simple timeline
Below is a typical timeline for a single-family home in moderate conditions. Actual durations vary by size, complexity and local conditions.
| Phase | Typical duration | Notes |
|---|---|---|
| Pre-construction (design & permits) | 2–6 months | Depends on permitting complexity |
| Site works & foundations | 2–6 weeks | Soil conditions can extend duration |
| Shell & load-bearing structure | 4–12 weeks | Includes floors and masonry |
| Roof structure & covering | 2–6 weeks | Prefabrication accelerates work |
| Rough installations & insulation | 3–8 weeks | Sequential but often overlapping |
| Internal finishes & external works | 4–12 weeks | Final snagging and commissioning |
Roles and responsibilities on site
A successful Bauablauf depends on clear roles. Here’s a simplified list of the main players and what they do:
- Owner/Client: funds the project, makes major decisions
- Architect: design, coordination, aesthetic and functional decisions
- Structural engineer: calculates loads, designs the Gründung and structural elements
- Contractor/Builder: organizes trades, manages site logistics
- Specialist subcontractors: roofing, electrical, plumbing, HVAC
- Site manager or foreman: day-to-day supervision
- Building inspector: legal compliance and safety checks
Clear contracts and defined responsibilities reduce blame games when things don’t go perfectly.
Common problems and how to avoid them

Even the best projects encounter issues. Here are the usual suspects and practical advice to avoid them:
- Unclear scope of work: use detailed drawings and specifications before tendering
- Poor site access: plan logistic routes and storage before deliveries
- Weather delays: schedule critical external works in favorable seasons
- Poor coordination of trades: implement a simple daily or weekly plan with the foreman
- Inadequate inspection: use checklists to ensure each milestone is signed off
Proactive communication is the single best antidote to most problems.
Cost control and procurement strategies
Costs balloon when surprises happen. Lock in key prices with suppliers early for long lead items such as windows, trusses, and HVAC equipment. Small savings on many items can add up, but never compromise critical elements like foundations or waterproofing to save money. Implement a contingency — typically 5–10% of contract value — for unforeseen events, and track expenditures against a baseline budget weekly.
Health, safety and environmental considerations
Construction sites are hazardous. Implement a site-specific safety plan that includes PPE requirements, fall protection, machinery operation rules and emergency procedures. Environmentally, minimize waste by ordering materials accurately, storing them correctly and reusing when possible. Consider recycling plans for timber, metal and concrete waste streams, and protect local waterways from sediment runoff during earthworks.
Simple safety checklist
- Daily toolbox talks and induction for all site personnel
- Designated first-aid and emergency contacts
- Safe storage of hazardous materials
- Regular equipment inspections and maintenance
Sustainability and energy efficiency in the Bauablauf
Modern construction increasingly focuses on sustainability. From the Gründung to the Dachstuhl, there are choices that reduce energy use and carbon footprint. Consider:
- High-performing insulation and airtightness to reduce heating loads
- Thermal mass (e.g., concrete slabs) to stabilize indoor temperatures
- Renewable heating: heat pumps and solar-thermal integration
- Material choices: sustainably sourced timber, recycled materials
- Design for longevity and ease of maintenance
Early decisions determine a building’s long-term energy profile. Investing a little more at the start often pays off in lower running costs and higher resale value.
Documentation and legal aspects
Keep a complete record: contracts, change orders, inspection reports, certificates and as-built drawings. This documentation is vital for warranty claims, future renovations, and legal protection if disputes arise. Contractually define change-order processes, payment milestones and defect liability periods. For larger projects, consider neutral third-party mediation clauses to resolve disputes without litigation.
Useful templates and checklists to keep on site

To keep things practical, here are some templates you can use in the field. Treat them as living documents that change as the project progresses.
| Document | Purpose | When to use |
|---|---|---|
| Daily site log | Record progress, deliveries, weather and incidents | Each working day |
| Inspection checklist | Systematic sign-off for key milestones (formwork, reinforcement, waterproofing) | Before and after critical work |
| Change order form | Document scope, cost and time impacts for variations | Whenever changes occur |
| Punch list | Track defects to be fixed before final handover | Practical completion |
Practical tips from experienced builders
After years on sites, builders collect practical wisdom. Here are distilled tips:
- Plan buffers: have time and budget contingency. Projects rarely run exactly to plan.
- Order long-lead items early: windows, trusses, and special finishes can hold up work.
- Document everything: photos, emails, and receipts save time and headaches later.
- Use mock-ups for complex details: a small mock-up of a wall junction or window detail prevents mistakes.
- Prioritize the envelope: get foundations, roof and windows done early to protect interior finishes.
Common terminology (Baubegriffe) you’ll hear on site
For those new to the trade, here are common terms you’ll hear:
- Gründung — foundation
- Dachstuhl — roof truss/structure
- Decke — ceiling/floor slab
- Rohbau — shell construction (structural work)
- Fensterbank — window sill
- Abnahme — handover or inspection acceptance
Knowing the vocabulary helps you follow conversations and ensure everyone is aligned.
Conclusion
The Bauablauf from Gründung to Dachstuhl is a layered, human process that mixes engineering, artistry and logistics; it demands good planning, clear communication, and disciplined execution. If you focus on the fundamentals — accurate ground investigation, robust foundations, weather-tight envelopes, coordinated MEP work, and careful roof construction — you will avoid many of the common traps that cause delays and cost overruns. Treat the sequence as a living plan: update it, document changes, and keep the team informed. With patience, attention to detail and the right people, the seemingly complex passage from bare earth to covered, habitable space becomes a predictable and even enjoyable journey.